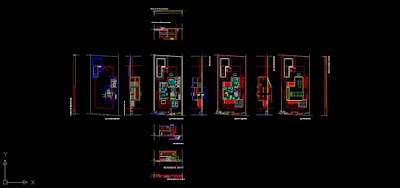
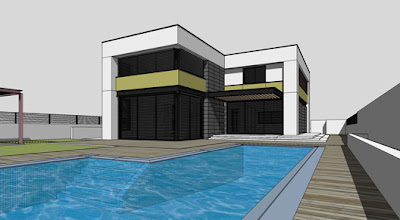
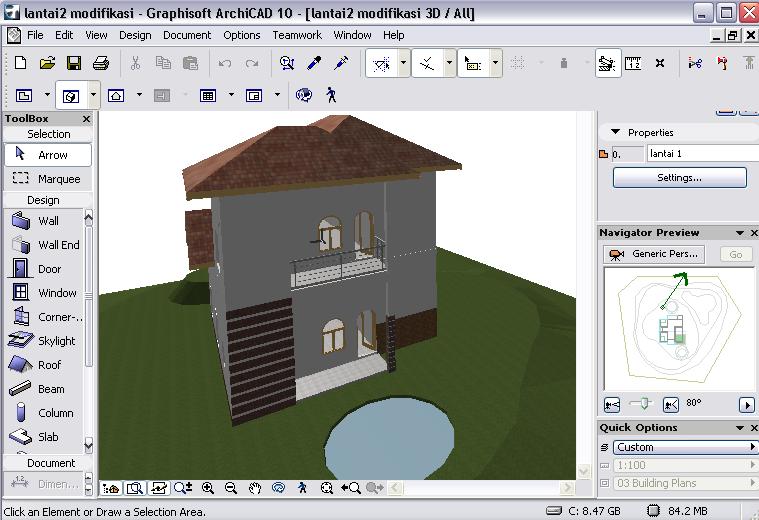
Pemodelan objek diatas berawal dari sebuah denah yang dibuat di program Autocad, kemudian dimasukan di program sketchup, lalu di program sketchup itulah dibuat pemodelan 3 dimensinya, kemudian untuk hasil akhirnya objek tersebut kita export ke program 3 ds max (cara mengexport lihat artikel sebelumnya, makanya langganan argajogja ben ra ketinggalan, he3x) lalu kemudian di render menggunakan plugin vray. Gambar diatas adalah gambar hasil akhir dari renderan menggunakan 3 ds max vray.
Tutorial ini bersumber dari proyeknya mas ronenbekerman yang kemudian tak posting lagi di blog argajogja supaya koe2 kabeh pada ngerti semua he3x.. tapi maaf, belum tak translate ke dalam bahasa indonesia soale uakeh tenan lagian aq yo rodok mumet nek gang nranslate menranslate, silahkan di transalete dewe itung2 sambil latihan boso jowowa minimalist gitu.. (boso inggris maksute, he3x..) selamat mengikuti...
More than a ‘HOW-TO’ but not really qualifying as a fully-fledged tutorial, a ‘MAKING-OF’ post is a collection of spotlights illuminating several different aspects involving in the creation of the subject scene. Hopefully, the information I’m sharing here will be useful for all of you 3d visualization artists, architects, designers and anyone else with an interest in 3d architectural visualization
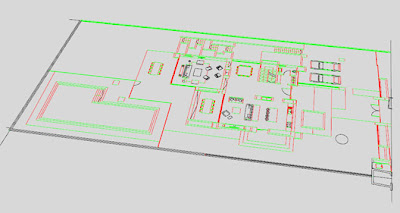
The first things I usually get from a client are the CAD drawings for the project at hand (a rare few manage to send me the down payment first). These files will be the baseline for the 3d model to be created and it is very important to set them right to prevent problems down the road. as you can see below, the original drawings sent by the architect contains a large amount of information we don’t need to transfer to SketchUP
 Here are a few things to check and do before moving on to SketchUP
Zoom extents
what you see on screen initially is not necessarily all the content inside the files, some parts might be far away from each other. Zooming extents will let you know if this is the case with your file and you can act accordingly by moving or deleting parts of it.
Check it sideways
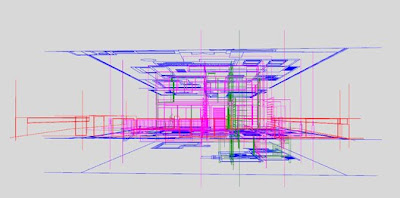
I know this sound odd, CAD drawings supposed to be 2d no? but believe me, sometimes they come more 3d then your 3d model will ever be. most times only site survey contour lines will spread along the Z axis and some additional information related to that and its OK, the problem is some draftsman snap to those lines while viewing the plan in 2d top view never knowing they go up and down the Z line. you really don’t wont to export that to SketchUP.
The best solution is to use the Flatten command and when it fails (and it will) try to change the Z and Elevation values for the drawing object from the properties panel. it’s tedious but well worth the effort. SketchUP has a ruby script that can do that too, but i wouldn’t try it on complex drawings though.
XREF’s
Check the drawings for xref’s and bind them in if you need them, SketchUP will ignore them on import unless you do. sometimes Blocks behave the same and you can solve this by exploding them before export.
Hide layers
Do not delete information you don’t need, just hide it while you manipulate the file. I usually hide all the dimension lines, text, hatches, vegetation and basically strive to end up with just the bare bones of the design. Sometimes I’ll keep furniture layers or Hidden-line layers and rename them to something descriptive for later use in SketchUP (i can just hide it back there too).
Purge, Audit and Copy Paste it out
After all is hidden and the files is rather clean, I’ll run Purge and Audit to make sure all unnecessary information is out and errors are fixed. The next step will be to select all and copy it to be pasted into a new file at the origin location (0,0,0) – this is very importnat. The original drawings might not be located at the origin, but rather far away from it – SketchUP doesn’t take it too well if things are far away from (0,0,0). Pasting it all in a new file takes care of all that, and also make sure you only get what you need in the file.
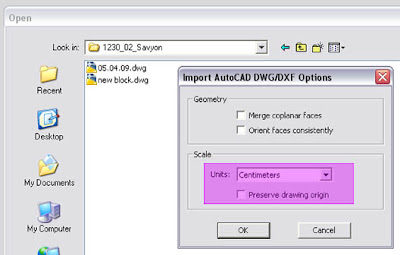
After doing all that is mentioned above, you can safely import the CAD file from within SketchUP, just make sure to take note of the units used in the drawings and set the same units in the import properties panel. choosing ‘Preserve drawing origin’ will keep the imported drawing at it same location relative to (0,0,0) as in the CAD file – if not, it will be move to the SketchUP origin automatically, which is good if you forgot about copy pasting it manually like i mentioned above.
Organize your layers
After the import I’ll make sure it all looks OK and delete almost all the original CAD layers to prevent clatter in the list. I usually keep the furniture, hidden line-work and vegetation layers for later use (and hide them most of the time).
Check the lines
Using color by axis view mode will allow you to examine the line-work and spot potential problem areas. sometimes lines just look parallel to each and only when you are deep into the modeling stage you discover issues related to that. Spend some time checking the lines with this option just to make sure all is well.
Group it all up
It is good practice to group all the content within a SketchUP model, since layering is only a visual separation in SketchUP and hidden data can merge with new data if you are not fully in control of what you do. I would make groups of each plan, elevation and section and position them in 3d, essentially building a rig or scaffolding from them.
Since the modeling of the house is not in the scope of this post I’ll just show some parts and share some tips related to it. Just add a comment below if you would like me to share some more information specifically about the modeling.
Adding some high detail
True sharp edges are hard to come by in the real world, almost everything has some kind of a bevel to it at the edges and this is the part that picks up the light showing a nice highlight. here you can see a part of the stone cladding on the facade were i modeled the beveled edges using the SketchyBevel v0.1 script by Chris Phillips. Another script you can use to round edges is RoundCorner 2.1a by Fredo6.
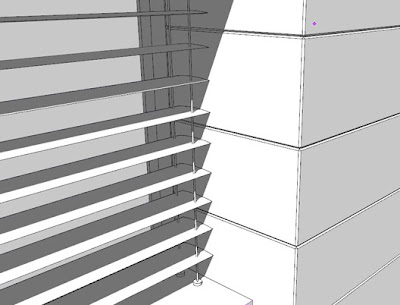 You can also see, in the image above and below, the modeled shading louvers i created for the windows along with the wires that suppose to lead them on the way up and down. This might be considered as overhead for some but as i really like it if i can render some closeup shots and then this really looks good (though for extreme closeup’s it’s still lacking)
 You can some more layers of detail by adding curtains behind the windows. Here is a quick video showing how a simple curtain can be modeled in SketchUP using the freehand tool, FFD (Free Form Modifier) script by Chris Phillips and also the Subdivide & Smooth script by Dale Martens. I’m also testing screenr.com recording this video so bare with me please.
If you are not sure, group it!
Don’t just leave things hanging out there in the model file, keep it all in groups & components. Like i mentioned previously, SketchUP layering system is visual only and must be backed up by arranging the geometry into groups (that is, if you want to keep control over any kind of model). I make it a habit to keep all lower level geometry in default layer 0 and only send groups & components to other layers.
Don’t be afraid to create many groups, you can explode and rearrange them later, separating geometry later is more difficult. I know that all the lines showing in the model could be a problem if you intend to produce purely SketchUP images, but if it is to be sent for rendering with V-Ray then that’s not a problem at all.
Facing the right direction
Initial SketchUP model show only 2 colors representing the front and back side of the faces (the Normal side and the opposite), But once you start adding materials and textures that visual Que is lost and things can flip on you. Use the monochrome view mode to catch potential problems and correct using the orient faces command before you find it in 3d Studio Max.
Adding textures
Try to add as much material and textural information in SketchUP as you can, this will save a lot of time later on. For a project that goes to 3d Studio Max i wouldn’t even care about the colors i pick and if they represent the actual material in the real world, for me it’s just material separation since i export the model according to it. For simple planer mapped objects i would take the time to apply and map the diffuse (color) image so to get it right in 3dsmax later on.
In this post I described some aspects of my SketchUP work from getting the original CAD drawings and up to the finished model. I hope you find this information helpful and please feel free to comment below and use the share this button below to let others know about it too.
In part 2 i will cover topics starting from the export of the SketchUP 3d model and up to the final render & post-production (I hope i can get it all in just one more part).
If you liked this article, and want to be notified when new posts like this are being published, please consider subscribing to the blog via one or more of the options below. You can also share with others using the ShareThis button.
Source: www.ronenbekerman.com
bersambung


